Part 4 ; Lesson 2 : Nodemcu web server using SPIFFS and DHT11 Sensor
- WatchIT Group

- Aug 2, 2020
- 8 min read
In this Lesson it shows how to build a web server that uses HTML and CSS files stored on the ESP8266 NodeMCU filesystem (SPIFFS) using Arduino IDE. Instead of having to write the HTML and CSS text into the Arduino sketch, we’ll create separate HTML and CSS files.

The web server we’ll build shows how to control the ESP8266 outputs and how to display sensor readings. As an example, we’ll control an LED and display sensor readings from a DHT11 sensor.
You can use the concepts learned in this tutorial to control any output or display sensor readings from other sensors.
Project description
Before going straight to the project, it’s important to outline what our web server will do, so that it’s easier to understand.
The web server controls an LED connected to the ESP8266 GPIO 2. This is the ESP8266 on-board LED. You can control any other GPIO;
The web server page shows two buttons: ON and OFF – to turn GPIO 2 on and off;
The web server page also shows the current GPIO state;
You’ll also use a BME280 sensor to display sensor readings (temperature, humidity, and pressure).
How its works

Before proceeding with this project, make sure you check all the following prerequisites ,
beyond installing Esp8266 module in Arduino IDE and Filesystem Uploader Plugin
Installing Libraries
One of the easiest ways to build a web server using files from the filesystem is using the ESPAsyncWebServer library.
Installing the ESPAsyncWebServer library
This library is not available to download through the Arduino IDE libraries manager. So, you need to follow the next steps to install the library:
Click here to download the ESPAsyncWebServer library. You should have a .zip folder in your Downloads folder
Unzip the .zip folder and you should get ESPAsyncWebServer-master folder
Rename your folder from ESPAsyncWebServer-master to ESPAsyncWebServer
Move the ESPAsyncWebServer folder to your Arduino IDE installation libraries folder
You can go to Sketch > Include Library > .zip Library and select the previously downloaded library.
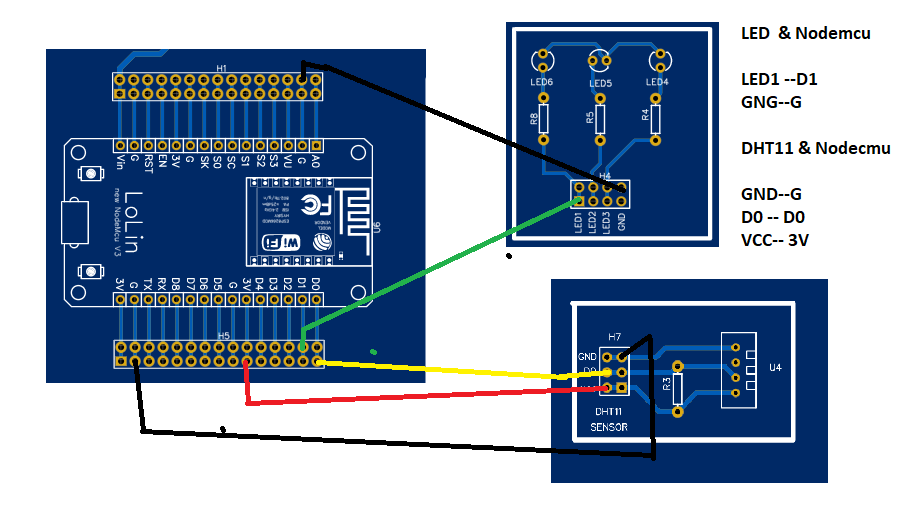
Circuit Diagram

Organizing Your Files
To build the web server you need three different files. The Arduino sketch, the HTML file and the CSS file. The HTML and CSS files should be saved inside a folder called data inside the Arduino sketch folder, as shown below:

HTML File , Index.html
<!DOCTYPE html>
<html>
<head>
<title>Menya IoT Kit Webserver with SPIFF</title>
<meta name="viewport" content="width=device-width, initial-scale=1">
<link rel="icon" href="data:,">
<link rel="stylesheet" type="text/css" href="style.css">
</head>
<body>
<h1>Menya IoT Kit Dashboard using SPIFF</h1>
<p>GPIO State<strong> %STATE%</strong></p>
<p>
<a href="/on"><button class="button">ON 1</button></a>
<a href="/off"><button class="button button2">OFF 1</button></a>
</p>
<p>
<span class="sensor-labels">Temperature</span>
<span id="temperature">%TEMPERATURE%</span>
<sup class="units">°C</sup>
<span class="sensor-labels">Humidity</span>
<span id="humidity">%HUMIDITY%</span>
<sup class="units">%</sup>
</p>
</body>
<script>
setInterval(function ( )
{
var xhttp = new XMLHttpRequest();
xhttp.onreadystatechange = function() {
if (this.readyState == 4 && this.status == 200)
{
document.getElementById("temperature").innerHTML = this.responseText;
}
};
xhttp.open("GET", "/temperature", true);
xhttp.send();
}, 10000 ) ;
setInterval(function ( ) {
var xhttp = new XMLHttpRequest();
xhttp.onreadystatechange = function() {
if (this.readyState == 4 && this.status == 200) {
document.getElementById("humidity").innerHTML = this.responseText;
}
};
xhttp.open("GET", "/humidity", true);
xhttp.send();
}, 10000 ) ;
</script>
</html>
<footer>
<p>Author : WatchIT Group <br>
<a href="www.watchitgroup.online">info@watchitgroup.online</a></p>
</footer>Because we’re using CSS and HTML in different files, we need to reference the CSS file on the HTML text.
<link rel="stylesheet" type="text/css" href="style.css">The <link> tag tells the HTML file that you’re using an external style sheet to format how the page looks. The rel attribute specifies the nature of the external file, in this case that it is a stylesheet—the CSS file—that will be used to alter the appearance of the page.
The type attribute is set to “text/css” to indicate that you’re using a CSS file for the styles. The href attribute indicates the file location; since both the CSS and HTML files will be in the same folder, you just need to reference the filename: style.css.
Then, add a paragraph with the text “GPIO state: ” followed by the GPIO state. Because the GPIO state changes accordingly to the state of the GPIO, we can add a placeholder that will then be replaced for whatever value we set on the Arduino sketch.
To add placeholder use % signs. To create a placeholder for the state, you can use %STATE%, for example.
<p>GPIO state<strong> %STATE%</strong></p>You attribute a value to the STATE placeholder in the Arduino sketch.
Then, create an ON and an OFF buttons. When you click the on button, we redirect the web page to to root followed by /on url. When you click the off button you are redirected to the /off url.
<a href="/on"><button class="button">ON</button></a>
<a href="/off"><button class="button button2">OFF</button></a>
Finally, create three paragraphs to display the temperature, humidity and pressure.
<p>
<span class="sensor-labels">Temperature</span>
<span id="temperature">%TEMPERATURE%</span>
<sup class="units">°C</sup>
<span class="sensor-labels">Humidity</span>
<span id="humidity">%HUMIDITY%</span>
<sup class="units">%</sup>
</p>We use the %TEMPERATURE% and %HUMIDITY% placeholders. These will then be replaced by the actual temperature readings in the Arduino sketch.
Automatic Updates with Javascript
we add JavaScript in our HTML file that is responsible for updating the temperature readings without the need to refresh the web page.
The following snipet of code is responsible for the temperature and Humidity.
<script>

  setInterval(function ( )
  {
    var xhttp = new XMLHttpRequest();
    xhttp.onreadystatechange = function() {
      if (this.readyState == 4 && this.status == 200)
       {
        document.getElementById("temperature").innerHTML = this.responseText;
      }
    };
    xhttp.open("GET", "/temperature", true);
    xhttp.send();
  }, 10000 ) ;

  setInterval(function ( ) {
    var xhttp = new XMLHttpRequest();
    xhttp.onreadystatechange = function() {
      if (this.readyState == 4 && this.status == 200) {
        document.getElementById("humidity").innerHTML = this.responseText;
      }
    };
    xhttp.open("GET", "/humidity", true);
    xhttp.send();
  }, 10000 ) ;


</script>
To update the temperature and humidity, we have a setInterval() function that runs every 10 seconds.
Basically, it makes a request in the /temperature and /humidity URL to get the latest temperature and humidity reading.
 xhttp.open("GET", "/temperature", true);
    xhttp.send();
  }, 10000 ) ;
 xhttp.open("GET", "/humidity", true);
    xhttp.send();
  }, 10000 ) ;
When it receives that value, it updates the HTML element with temperature id and humidity id .
if (this.readyState == 4 && this.status == 200) {
  document.getElementById("temperature").innerHTML = this.responseText;
}
and same is applied to Humidity
Creation css file name style.css
html {
  font-family: Arial;
  display: inline-block;
  margin: 0px auto;
  text-align: center;
}
h1 {
  color: #0F3376;
  padding: 2vh;
}
p {
  font-size: 1.5rem;
}
.button {
  display: inline-block;
  background-color: #008CBA;
  border: none;
  border-radius: 4px;
  color: white;
  padding: 16px 40px;
  text-decoration: none;
  font-size: 30px;
  margin: 2px;
  cursor: pointer;
}
.button2 {
  background-color: #f44336;
}
.units {
  font-size: 1.2rem;
 }
.sensor-labels {
  font-size: 1.5rem;
  vertical-align:middle;
  padding-bottom: 15px;
}
Arduino Sketch
// Import required libraries
#include <ESP8266WiFi.h>
#include <ESPAsyncTCP.h>
#include <ESPAsyncWebServer.h>
#include <FS.h>
#include "DHT.h" // include Dht11 library

#define DHTPIN 16 // define pin where dht11 will be connected D2
#define DHTTYPE DHT11 //type of the DHT sensor

DHT dht(DHTPIN, DHTTYPE);

const char* ssid = "dlink_DWR-730_390F";
const char* password = "YDqhz55452";


// Set LED GPIO
const int ledPin = 5;
// Stores LED state
String ledState;

// Create AsyncWebServer object on port 80
AsyncWebServer server(80);

String getTemperature() // function to get temperature from dht11
{

  float temperature =dht.readTemperature();

  return String(temperature);
}

  String getHumidity()  //  // function to get humifdity from dht11
  {

  float humidity = dht.readHumidity();

  return String(humidity);
}


// Replaces placeholder with LED state value
String processor(const String& var)
{
  Serial.println(var);
  if(var == "STATE")
  {
    if(digitalRead(ledPin))
    {
      ledState = "ON";
    }
    else
    {
      ledState = "OFF";
    }
    Serial.print(ledState);
    return ledState;
  }
  else if (var == "TEMPERATURE")
  {
    return getTemperature();
  }
  else if (var == "HUMIDITY"){
    return getHumidity();
  }

}

void setup()
{
  // Serial port for debugging purposes
  Serial.begin(115200);
  pinMode(ledPin, OUTPUT);
  dht.begin();


  // Initialize SPIFFS
  if(!SPIFFS.begin())
  {
    Serial.println("An Error has occurred while mounting SPIFFS");
    return;
  }

  // Connect to Wi-Fi
  WiFi.begin(ssid, password);
  while (WiFi.status() != WL_CONNECTED) {
    delay(1000);
    Serial.println("Connecting to WiFi..");
  }

  // Print ESP32 Local IP Address
  Serial.println(WiFi.localIP());

  // Route for root / web page
  server.on("/", HTTP_GET, [](AsyncWebServerRequest *request)
  {
    request->send(SPIFFS, "/index.html", String(), false, processor);
  });

  // Route to load style.css file
  server.on("/style.css", HTTP_GET, [](AsyncWebServerRequest *request){
    request->send(SPIFFS, "/style.css", "text/css");
  });

  // Route to set GPIO to HIGH
  server.on("/on", HTTP_GET, [](AsyncWebServerRequest *request)
  {
    digitalWrite(ledPin, HIGH);
    request->send(SPIFFS, "/index.html", String(), false, processor);
  });

  // Route to set GPIO to LOW
  server.on("/off", HTTP_GET, [](AsyncWebServerRequest *request){
    digitalWrite(ledPin, LOW);
    request->send(SPIFFS, "/index.html", String(), false, processor);
  });

  server.on("/temperature", HTTP_GET, [](AsyncWebServerRequest *request){
    request->send_P(200, "text/plain", getTemperature().c_str());
  });

  server.on("/humidity", HTTP_GET, [](AsyncWebServerRequest *request){
    request->send_P(200, "text/plain", getHumidity().c_str());
  });


  // Start server
  server.begin();
}

void loop()
{

}
Code Explained
Next, create a variable that refers to GPIO 2 called ledPin, and a String variable to hold the led state: ledState.
const int ledPin = 5;
String ledState;
Create an AsynWebServer object called server that is listening on port 80.
AsyncWebServer server(80);Get Sensor Readings from Dht11 sensor
We create Two functions to return the sensor readings as strings: the getTemperature(), and getHumidity()
Here’s how the getTemperature() function looks like (the other functions are similar).
String getTemperature() // function to get temperature from dht11
{
  float t = dht.readTemperature(); // read temperature from dht11 sensor
  float temperature = t;

  return String(temperature);
}
processor()
The processor() function attributes a value to the placeholders we’ve created on the HTML file. It accepts as argument the placeholder and should return a String that will replace the placeholder. The processor() function should have the following structure:
 String processor(const String& var)
{
  Serial.println(var);
  if(var == "STATE")
  {
    if(digitalRead(ledPin))
    {
      ledState = "ON";
    }
    else
    {
      ledState = "OFF";
    }
    Serial.print(ledState);
    return ledState;
  }
  else if (var == "TEMPERATURE")
  {
    return getTemperature();
  }
  else if (var == "HUMIDITY"){
    return getHumidity();
  }

}
This function first checks if the placeholder is the STATE we’ve created on the HTML file.
if(var == "STATE"){If it is, then, accordingly to the LED state, we set the ledState variable to either ON or OFF.
if(digitalRead(ledPin)){
  ledState = "ON";
}
else{
  ledState = "OFF";
}
Finally, we return the ledState variable. This replaces the STATE placeholder with the ledState string value.
return ledState;If it finds the %TEMPERATURE% placeholder, we return the temperature by calling the getTemperature() function created previously.
else if (var == "TEMPERATURE"){
  return getTemperature();
}
The same happens for the %HUMIDITY% and %TEMPERATURE% placeholders by calling the corresponding functions:
else if (var == "TEMPERATURE"){
  return getTemperature();
}
else if (var == "HUMIDITY"){
  return getHumidity();
}
Async Web Server
The ESPAsyncWebServer library allows us to configure the routes where the server will be listening for incoming HTTP requests and execute functions when a request is received on that route. For that, use the on method on the server object as follows:
server.on("/", HTTP_GET, [](AsyncWebServerRequest *request){
  request->send(SPIFFS, "/index.html", String(), false, processor);
});
When the server receives a request on the root “/” URL, it will send the index.htmlfile to the client. The last argument of the send() function is the processor, so that we can replace the placeholder with the value we want – in this case the ledState.
Because we’ve referenced the CSS file on the HTML file, the client will make a request for the CSS file. When that happens, the CSS file is sent to the client:
server.on("/style.css", HTTP_GET, [](AsyncWebServerRequest *request){
  request->send(SPIFFS, "/style.css","text/css");
});
You also need to define what happens on the /on and /off routes. When a request is made on those routes, the LED is either turned on or off, and the ESP8266 serves the HTML file.
server.on("/on", HTTP_GET, [](AsyncWebServerRequest *request){
  digitalWrite(ledPin, HIGH);
  request->send(SPIFFS, "/index.html", String(),false, processor);
});
server.on("/off", HTTP_GET, [](AsyncWebServerRequest *request){
  digitalWrite(ledPin, LOW);
  request->send(SPIFFS, "/index.html", String(),false, processor);
});
In the HTML file, we’ve written a JavaScript code that requests the temperature, humidity and pressure on the /temperature, /humidity routes, respectively, every 10 seconds. So, we also need to handle what happens when we receive a request on those routes.
We simply need to send the updated sensor readings. The updated sensor readings are returned by the getTemperature() and getHumidity() functions we’ve created previously.
The readings are plain text, and should be sent as a char, so, we use the c_str() method.
server.on("/temperature", HTTP_GET, [](AsyncWebServerRequest *request){
  request->send_P(200, "text/plain", getTemperature().c_str());
});

server.on("/humidity", HTTP_GET, [](AsyncWebServerRequest *request){
  request->send_P(200, "text/plain", getHumidity().c_str());
});
In the end, we use the begin() method on the server object, so that the server starts listening for incoming clients.
server.begin();Because this is an asynchronous web server, you can define all the requests in the setup(). Then, you can add other code to the loop() while the server is listening for incoming clients.
Uploading Code and Files
Go to Sketch > Show Sketch folder, and create a folder called data. Save the HTML and CSS files inside that folder;
In Tools > Board, select the ESP8266 board you’re using;
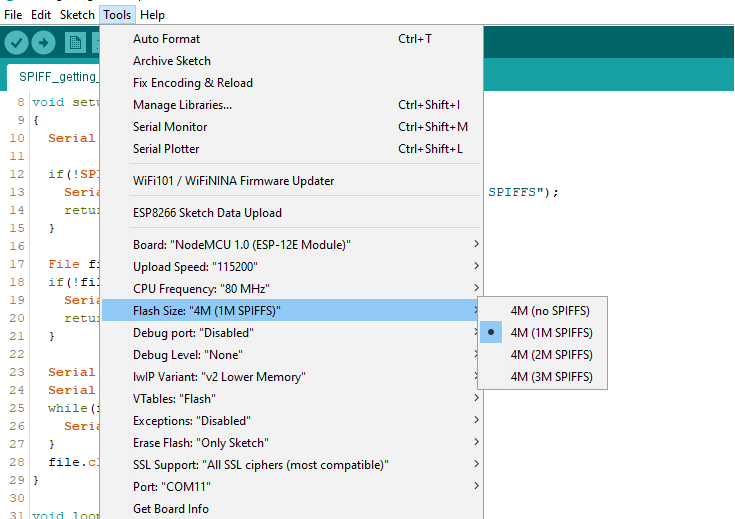
Then, go to Tools > Flash size and select 4M (1M SPIFFS).

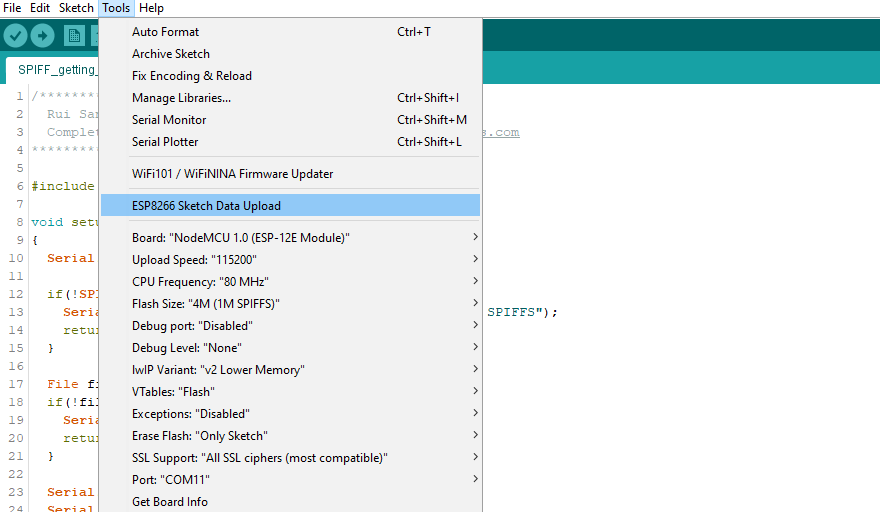
Finally, upload the files to your board. Go to Tools > ESP8266 Data Sketch Upload and wait for the files to be uploaded.

After uploading the the file to the Flash memory now you can upload the code to Nodemcu as usual,
Short video on Uploading the Files to Nodemcu
thanks for watching , for any challenge ask in the comment section !


API Connects is a leading cloud migration solution that supports enterprises with data, cloud, API, and AI driven solutions. Consult our engineers for digital transformation. https://apiconnects.co.nz/flexcube-core-banking-solutions-services/