
Part 4 : Intermediate level , lesson 1 : Install ESP8266 Filesystem Uploader in Arduino IDE
- WatchIT Group

- Jul 17, 2020
- 3 min read
The ESP8266 contains a Serial Peripheral Interface Flash File System (SPIFFS). SPIFFS is a lightweight filesystem created for micro-controller with a flash chip. This article shows how to easily upload files to the ESP8266 file system using a plugin for Arduino IDE.

Introducing SPIFFS
SPIFFS lets you access the flash chip memory like you would do in a normal filesystem in your computer, but simpler and more limited. You can read, write, close, and delete files. SPIFFS doesn’t support directories, so everything is saved on a flat structure.
Using SPIFFS with the ESP8266 board is specially useful to:
Create configuration files with settings;
Save data permanently;
Create files to save small amounts of data instead of using a microSD card;
Save HTML and CSS files to build a web server;
Save images, figures and icons;
And much more.
In most of our web server projects, we’ve written the HTML code for the web server as a String directly on the Arduino sketch. With SPIFFS, you can write the HTML and CSS in separated files and save them on the ESP8266 filesystem.
Installing the Arduino ESP8266 Filesystem
You can create, save and write files to the ESP8266 filesystem by writing the code yourself in Arduino IDE. This is not very useful, because you’d have to type the content of your files in the Arduino sketch.
Fortunately, there is a plugin for the Arduino IDE that allows you to upload files directly to the ESP8266 filesystem from a folder in your computer. This makes it really easy and simple to work with files. Let’s install it.
Follow the next steps to install the filesystem uploader:
1) Go to the releases page and click the ESP8266FS-X.zip file to download.

2) Go to the Arduino IDE directory, and open the Tools folder.

3) Unzip the downloaded .zip folder to the Tools folder. You should have a similar folder structure:
<home_dir>/Arduino-<version>/tools/ESP8266FS/tool/esp8266fs.jar
4) Finally, restart your Arduino IDE.
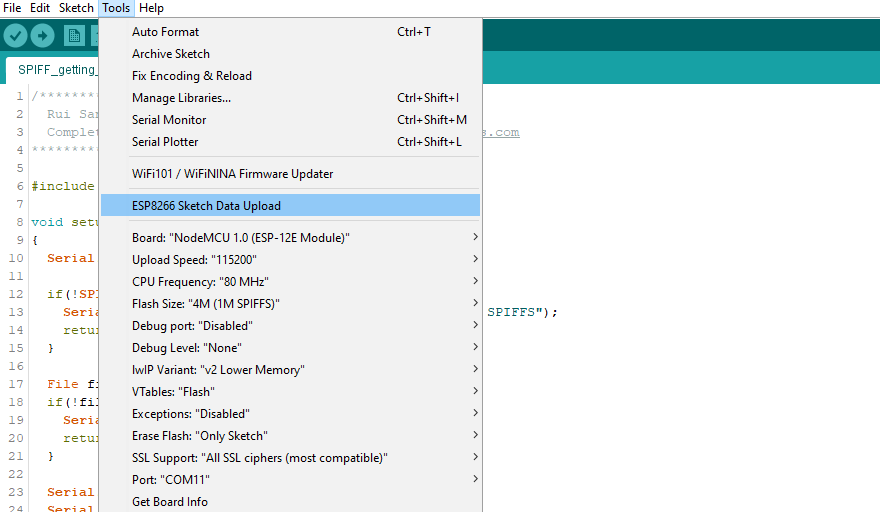
To check if the plugin was successfully installed, open your Arduino IDE and select your ESP8266 board. In the Tools menu check that you have the option “ESP8266 Sketch Data Upload“.

Uploading Files using the Filesystem Uploader
To upload files to the ESP8266 filesystem follow the next instructions.
1) Create an Arduino sketch and save it. For demonstration purposes, you can save an empty sketch.
2) Then, open the sketch folder. You can go to Sketch > Show Sketch Folder. The folder where your sketch is saved should open.

3) Inside that folder, create a new folder called data.

4) Inside the data folder is where you should put the files you want to be saved into the ESP8266 filesystem. As an example, create a .txt file with some text called test_example.

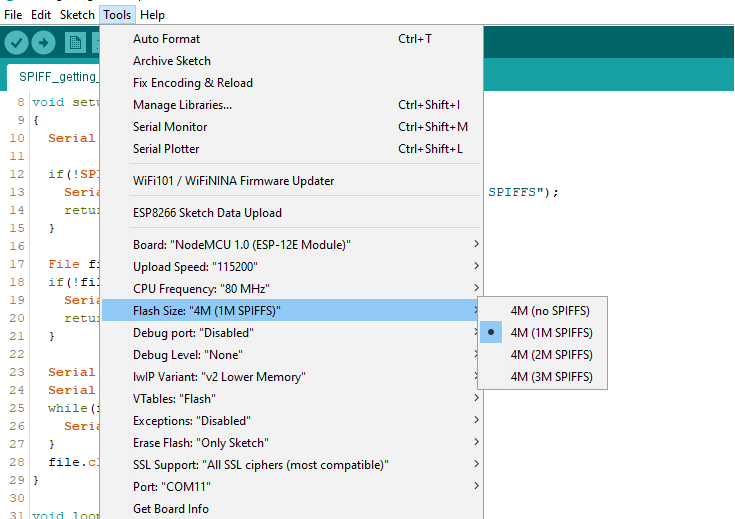
5) In the Arduino IDE, in the Tools menu, select the desired SPIFFS size (this will depend on the size of your files)
6) Then, to upload the files, in the Arduino IDE, you just need to go to Tools > ESP8266 Sketch Data Upload.
You should get a similar message on the debugging window. The files were successfully uploaded to the ESP8266 filesystem.

Now, let’s just check if the file was actually saved into the ESP8266 filesystem. Simply upload the following code to your ESP8266 board
Code
#include "FS.h"

void setup() {
  Serial.begin(115200);

  if(!SPIFFS.begin()){
    Serial.println("An Error has occurred while mounting SPIFFS");
    return;
  }

  File file = SPIFFS.open("/test_example.txt", "r");
  if(!file){
    Serial.println("Failed to open file for reading");
    return;
  }

  Serial.println();
  Serial.println("File Content:");
  while(file.available()){
    Serial.write(file.read());
  }
  file.close();
}

void loop() {

}
After uploading, open the Serial Monitor at a baud rate of 115200. Press the ESP8266 “RST” button. It should print the content of your .txt file on the Serial Monitor.

Using the filesystem uploader plugin is one of the easiest ways to upload files to the ESP8266 filesystem. You can save HTML and CSS files to build a web server, images or small icons, save configuration files, etc…
Thanks for reading


API Connects is a technology services brand that supports enterprises with data, cloud, API, and AI-driven solutions, including IoT solutions and AI and ML services. Consult our engineers for digital transformation. Visit: https://apiconnects.co.nz/ai-automation-machine-learning/