
Part 3 , lesson 3 : ESP8266 NodeMCU Access Point (AP) for Web Server without using internet
- WatchIT Group

- Jul 7, 2020
- 3 min read
In this Lesson , you’ll learn how to set your ESP8266 NodeMCU as an Access Point (AP) using Arduino IDE. This allows you to connect directly to your ESP8266 via Wi-Fi without a wireless router.
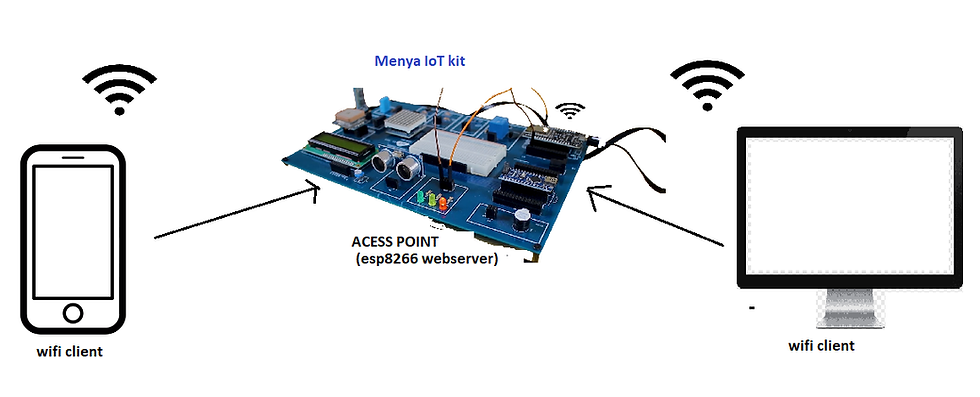
ESP8266 webserver (Stationary) and Access Point
In previous lesson we connect the ESP8266 to a wireless router or your Phone WiFi .
and in those scenarios, the router (Phone as wifi provider) acts as an access point and the ESP8266 is set as a station (webserver). So, you need to be connected to your router (local network) to control the ESP8266.
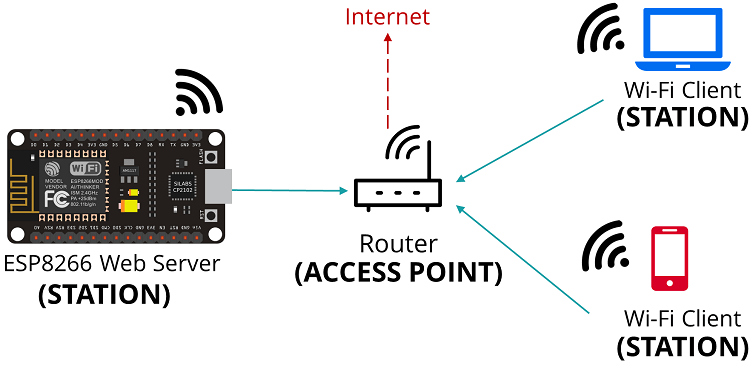
In some cases, this might not be the best configuration (when you don’t have a router nearby or simply when you don't have internet ). But if you set the ESP8266 as an access point (hotspot), you can be connected to the ESP8266 using any device with Wi-Fi capabilities without the need to connect to your router.
In simple words, when you set the ESP8266 as an access point you create its own Wi‑Fi network and nearby Wi-Fi devices (stations) can connect to it (like your smartphone or your computer).

In this tutorial, we’ll show you how to set the ESP8266 as an access point in your web server projects. This way, you don’t need to be connected to a router to control your ESP8266.
Because the ESP8266 doesn’t connect further to a wired network (like your router), it is called soft-AP (soft Access Point).
In the first example we are going to control an LED , without using internet simply by connecting to the ESP8266 device as a wifi provider.
read careful these code and try to understand them , there is comment on most of the code to help you understand.
#include <ESP8266WebServer.h>
#include <ESP8266WiFi.h>
#include <WiFiClient.h>  // these are  libraries

ESP8266WebServer server(80);

// Make a wifi name and password as access points
const char *ssid = "MenyaIoT";
const char *password = "goodluck";

#define LED 5 // D1 on the nodemcu
int statusLED = LOW; // variable for LED status it should be whenever you give power to nodmcu

// -----------------------------------------------------------------------------------------------------------------Declare constants to make the page to be visited.
const String HtmlHtml = "<html><head>"
"<meta name=\"viewport\" content=\"width=device-width, initial-scale=1\" /></head>";
const String HtmlTitle = "<h1>Control LED Using NodeMCU WiFi Access Point on Menya IoT kit</h1><br/>\n";
const String HtmlLedStateLow = "<big>LED is now <b>OFF</b></big><br/><br/>\n";
const String HtmlLedStateHigh = "<big>LED is now <b>ON</b></big><br/><br/>\n";
const String HtmlButtons =
"<a href=\"LEDOn\"><button style=\"background-color:green;color:white;width:20%;height:5%;\">ON </button></a>\n"
"<a href=\"LEDOff\"><button style=\"background-color:red;color:white;width:20%;height:5%;\">OFF </button></a><br/>";
const String HtmlHtmlClose = "</html>";
// -----------------------------------------------------------------------------------------------------------------

// Function / procedure for turning on the LED
void handleLedOn()
{
  statusLED = HIGH; // conditions to make the LED turn on
  digitalWrite(LED, statusLED);
  Serial.println("NodeMCU ESP8266 : LED is ON");
  response();
}

// Function / procedure for turning off the LED
void handleLedOff() {
  statusLED = LOW; // conditions to make the LED turn off
  digitalWrite(LED, statusLED);
  Serial.println("NodeMCU ESP8266 : LED is OFF");
  response();
}

// Function / procedure to handle each client making a request
void response()
{
  String htmlRes = HtmlHtml + HtmlTitle; // initial web page
  if(statusLED == LOW)  // when LED status is low
  {
    htmlRes += HtmlLedStateLow; // the htmlRes initial + the status "LED is OFF"
  }else{
    htmlRes += HtmlLedStateHigh; //  the htmlRes initial + the status "LED is ON"
  }

  htmlRes += HtmlButtons;
  htmlRes += HtmlHtmlClose;

  server.send(200, "text/html", htmlRes);
}

void setup() {
    delay(1000);
    Serial.begin(115200);
    Serial.println();

    WiFi.softAP(ssid, password);

    IPAddress apip = WiFi.softAPIP(); // Get the IP server
    Serial.print("Connect your wifi laptop/mobile phone to this NodeMCU Access Point : ");
    Serial.println(ssid);
    Serial.print("Visit this IP : ");
    Serial.print(apip); // Prints the IP address of the server to be visited
    Serial.println(" in your browser.");

    server.on("/", response);
    server.on("/LEDOn", handleLedOn);
    server.on("/LEDOff", handleLedOff);

    server.begin(); // Start the server
    Serial.println("HTTP server beginned");

    pinMode(LED, OUTPUT);
    digitalWrite(LED, statusLED);
}

void loop()
{
    server.handleClient(); // this when you make a request by inserting the Ip in the browser
}
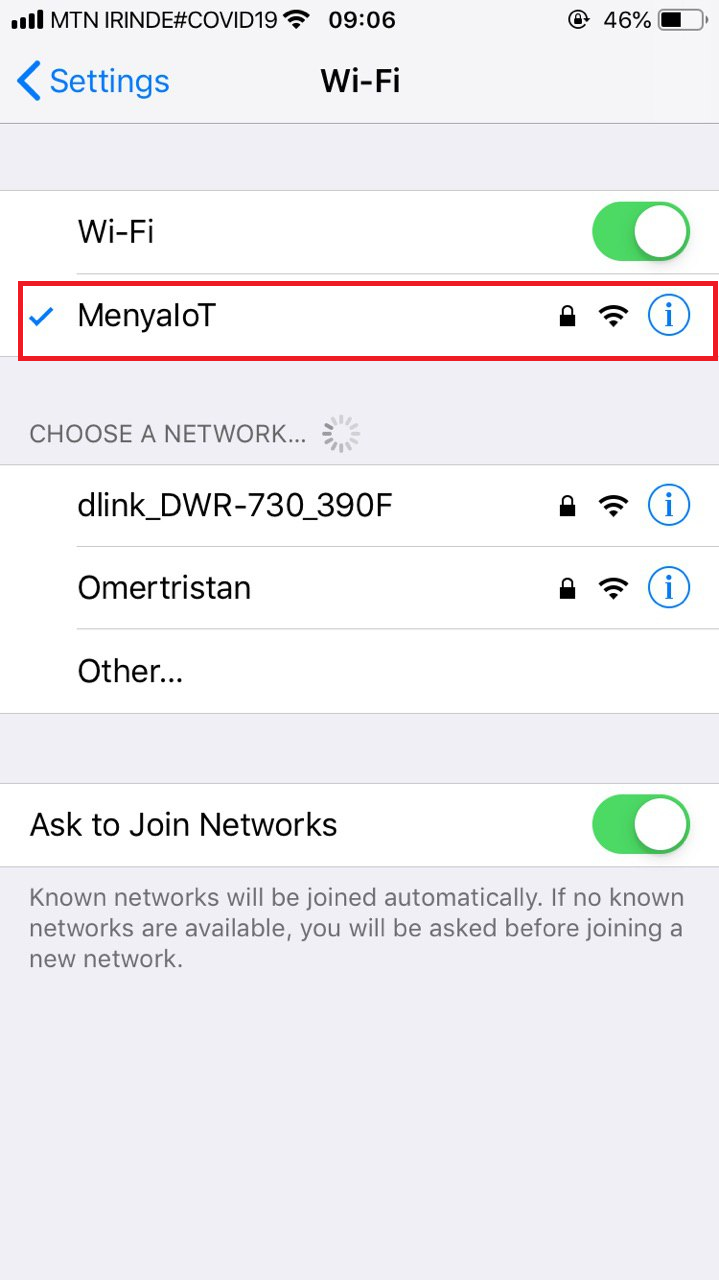
after uploading the code , find the network called "MenyaIoT" and connect to it use the password available in your code "goodluck" .
screenshot
after successful connection , open the Serial Monitor in the arduino and find the Ip address of the device.
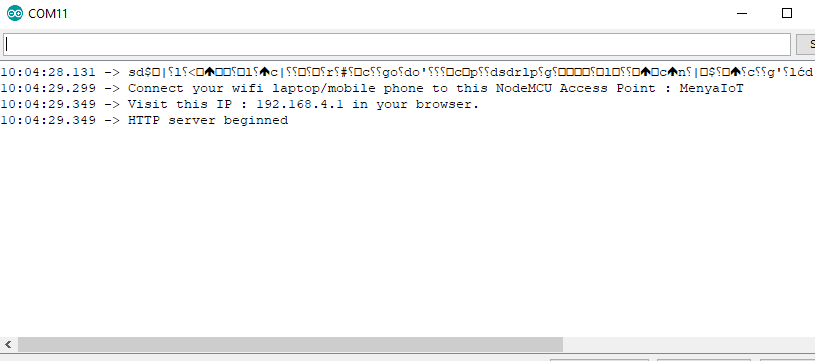
put the Ip address 192.168.4.1 in your browser.
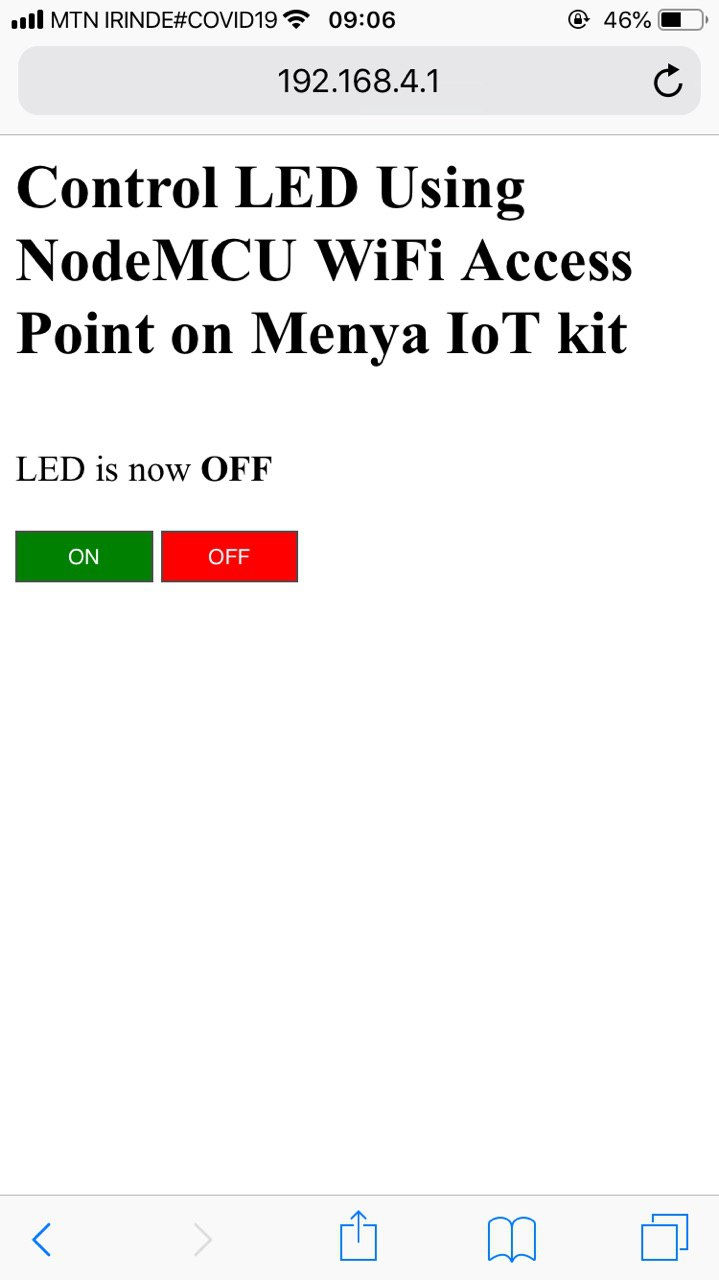
now you should be able to control you device without internet.
if you have some challenges on the html in the arduino code , get some basics from this web site to get an idea of html https://www.w3schools.com/html/default.asp
we recommend to try that link.
Here is the challenge to be solved , add two more LED control button and connect to D2 . and share your screenshot in the comment section.
we hope this lesson was helpful, feel free to ask questions in the comment section .
thanks


Comments