Part 2 ,Lesson 4 : Installing ESP8266 Board in Arduino IDE (Windows, Mac OS X, Linux).
- WatchIT Group

- May 13, 2020
- 1 min read
Install ESP8266 Add-on in Arduino IDE
To install the ESP8266 board in your Arduino IDE, follow these next instructions:
In your Arduino IDE, go to File> Preferences

Enter http://arduino.esp8266.com/stable/package_esp8266com_index.json into the “Additional Boards Manager URLs” field as shown in the figure below. Then, click the “OK” button:

Open the Boards Manager. Go to Tools > Board > Boards Manager…

Search for ESP8266 and press install button for the “ESP8266 by ESP8266 Community“:

This might take sometimes , make sure you have a good internet to install the package.

When it is finally installed you will be able to see like the above figure "Installed".
Video
Testing the Installation.
To test the ESP8266 add-on installation, let’s see if we can blink an LED with the ESP8266 using the Arduino programming language.

Circuit diagram LED Blinking Esp8266

Photo Menya IoT kit LED blinking.
Uploading the Sketch
Plug your board to your computer. Make sure you have the right board selected:

You also need to select the Port:

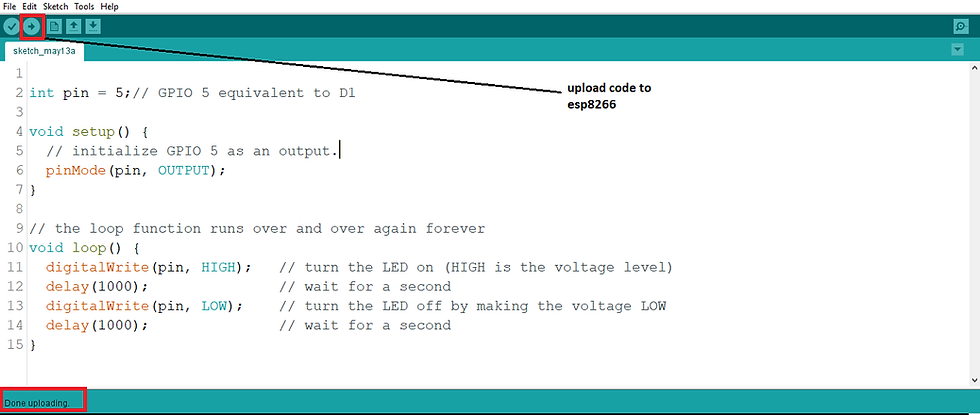
Click the “Upload” button in the Arduino IDE and wait a few seconds until you see the message “Done uploading.” in the bottom left corner.

This is a quick guide that illustrates how to prepare your Arduino IDE for the ESP8266 on a Windows PC, Mac OS X, or Linux computer.
That’s it, you’re ready to start building your own IoT projects with the ESP8266!


Thanks for the guidance it really helped in both installation and the final compliation. but i have a question what is the difference on working on the arduino NANO? Because i see it can all blink a led?
@Hirwa , thanks for your good question , in order to check the actual port your device (Arduino nano on Menya Iot kit ) is connected to , you need to check the following : right click on This PC > click on Properties > click on Device Manager ; from the device manager you will find Port (click on it ) to find where your device is connected to , most of the time it will be written (USB-Serial CH340 (com (Port No)).
Hope this is helpful.
hello Mates, it's worked but i've a question,
i used com5 port but upload fail after that i tried com4 and with com4 it's learned the upload was done..any explanation for why com4 work instead of com5?
Thanks
I'm getting a trouble when I'm uppdating.
can I get some help please
Super it's working !!