
Lesson 1 : LED Blinking with Menya IoT kit.
- WatchIT Group

- Nov 25, 2019
- 2 min read
Updated: May 27, 2020
LEDs are small, powerful lights that are used in many different applications. To start, we will work on blinking an LED, the Hello World of micro controllers.
It is as simple as turning a light on and off😎. Establishing this important baseline will give you a solid foundation as we work towards experiments that are more complex.
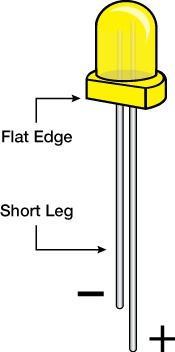
Note − To find out the polarity of an LED, look at it closely. The shorter of the two legs, towards the flat edge of the bulb indicates the negative terminal.
Circuit diagram.
With Menya IoT kit, connect as below ; GND to GND, D13 to LED1

Sketch
Open the Arduino IDE software on your computer. Coding in the Arduino language will control your circuit. Open the new sketch File by clicking New.

Sketch
The LED_BUILTIN is the D13 of the arduino Nano embedded on the Menya IoT Kit.
int LED=13;// declare the pin D13

void setup ()
{
// initialize digital pin D13 as an output.
pinMode (LED,OUTPUT);
}
// the loop function runs over and over again forever
void loop ()
{
digitalWrite(LED,HIGH);// turn the LED on (HIGH is the voltage level)
delay(1000);// wait for a second
digitalWrite(LED,LOW);//  turn the LED off by making the voltage LOW
delay (1000);// wait for second
}
Code to Note
pinMode(13, OUTPUT) − Before you can use one of Arduino’s pins, you need to tell Arduino Nano whether it is an INPUT or OUTPUT. We use a built-in “function” called pinMode() to do this.
digitalWrite(13, HIGH) − When you are using a pin as an OUTPUT, you can command it to be HIGH (output 5 volts), or LOW (output 0 volts).
After writing all the codes , compile to check if there is no error.

Before upload code , select the board (arduino Nano) , the port (any Number should be visible) and the processor (Atmega328P old bootloa).

Result
You should see your LED turn on and off. If the required output is not seen, make sure you have assembled the circuit correctly, and verified and uploaded the code to your board.
Note : For any difficulties with Menya IoT kit directly post a comment below so that our Team can support you.
If also you are able to Run it Successfully let us know😃.
Experiment 1 : make two LEDs to Turn ON & OFF simultaneously .
Example (Led Red on , Led Green off and vice versa ) and post the code in the comment sections.
Thank You guys!!


i can't execute any code due to the code below and i can't find the processor option in the toolbox any help? Arduino: 1.8.14 Hourly Build 2020/07/23 04:33 (Windows 10), Board: "Arduino Uno"
Sketch uses 936 bytes (2%) of program storage space. Maximum is 32256 bytes.
Global variables use 9 bytes (0%) of dynamic memory, leaving 2039 bytes for local variables. Maximum is 2048 bytes.
avrdude: stk500_getsync() attempt 1 of 10: not in sync: resp=0x00
avrdude: stk500_getsync() attempt 2 of 10: not in sync: resp=0x00
avrdude: stk500_getsync() attempt 3 of 10: not in sync: resp=0x00
avrdude: stk500_getsync() attempt 4 of 10: not in sync: resp=0x00
avrdude: stk500_getsync() attempt 5 of 10: not in sync: resp=0x00
avrdude: stk500_getsync() attempt 6 of 10: not…
Dear Victor , kindly change the keyword from "OUTPOUT" to OUTPUT ,
Hi, failing to verify here, 'OUTPOUT' was not declared in this scope:
int LED =13;
void setup ()
{
pinMode(LED,OUTPOUT);
}
void loop()
{
digitalWrite(LED,HIGH);
delay(1000);
digitalWrite(LED,LOW);
delay(1000);
}
int LED=13;// declare the pin D13
int LE=A2;
void setup ()
{
// initialize digital pin D13 as an output.
pinMode (LED,OUTPUT);
pinMode (LE,OUTPUT);
}
// the loop function runs over and over again forever
void loop ()
{
digitalWrite(LED,HIGH);// turn the red on
digitalWrite(LE,LOW);// turn the green off
delay(1000);// wait for a second
digitalWrite(LED,LOW);// turn the red off
digitalWrite(LE,HIGH);// turn the green on
delay (1000);// wait for second
}
Arduino: 1.8.12 (Mac OS X), Board: "Arduino Nano, ATmega328P"
Sketch uses 972 bytes (3%) of program storage space. Maximum is 30720 bytes.
Global variables use 9 bytes (0%) of dynamic memory, leaving 2039 bytes for local variables. Maximum is 2048 bytes.
avrdude: stk500_getsync() attempt 1 of 10: not in sync: resp=0x00
avrdude: stk500_getsync() attempt 2 of 10: not in sync: resp=0x00
avrdude: stk500_getsync() attempt 3 of 10: not in sync: resp=0x00
avrdude: stk500_getsync() attempt 4 of 10: not in sync: resp=0x00
avrdude: stk500_getsync() attempt 5 of 10: not in sync: resp=0x00
avrdude: stk500_getsync() attempt 6 of 10: not in sync: resp=0x00
avrdude: stk500_getsync() attempt 7 of 10: not in sync: resp=0x00
avrdude: stk500_getsync() attempt 8 of 10: not in sync:…